Create a Web3 Login with MetaMask Integrated with Firebase Auth and Firestore

Hi, there! I'm a front-end developer with a passion for web3 and blockchain development. I specialize in using technologies like Next.js, React, JavaScript, Ethers.js and SCSS to create beautiful and interactive user interfaces. Originally from Nigeria, I've worked with clients from all over the world to build modern and engaging websites and applications. When I'm not coding, you can usually find me reading up on the latest developments in the world of blockchain or exploring new technologies to incorporate into my work. Let's connect and create something amazing!
Overview
Web3 authentication is a new approach to online authentication that is based on decentralized, blockchain-based technologies. It is a departure from traditional Web-2 authentication methods, which rely on usernames and passwords and are typically controlled by centralized authorities.
Web3 authentication offers a more secure and decentralized approach to verifying users' identities online. This means that users can prove their identity without revealing their personal information, making it more private and secure.
Web3 authentication is based on the use of digital wallets, which are software programs that allow users to store and manage their cryptocurrencies and digital assets. These wallets use public-key cryptography to generate unique digital signatures, which are used to authenticate transactions on the blockchain.
This article will show you how to use the Thirdweb SDK to build a Firebase Web3 sign-in using MetaMask. You'll also discover how to build a straightforward Next.js application that utilizes Firebase Web3 authentication. You will have an excellent understanding of Web3 Firebase authentication after this tutorial, and you may use the same concepts in any subsequent Web3 projects.
What is Firebase?
Firebase is a backend platform that provides services to help you build and manage web and mobile applications. It is owned and operated by Google, and it is used by developers to build high-quality apps quickly and efficiently.
What is ThirdWeb?
Thirdweb is a software development kit (SDK) that enables developers to create decentralized applications (dApps) on the Ethereum blockchain. It is designed to simplify the development process for dApps by providing pre-built components and tools for creating smart contracts, managing user identities, and connecting to the Ethereum network.
Let's get started:
Have you ever tried to authenticate your Dapp with Metamask and save the user data to a database but found the process confusing? Look no further, as this tutorial provides a way to seamlessly create a Web3 login with Metamask and ThirdWeb integrated with Firebase Authentication and store the user data on Firestore.
This guide will show you how to integrate Auth as a custom authentication provider for Firebase and automatically create a document in the user's Firestore collection when a user signs up successfully.
Here is a screenshot of what we are going to build:
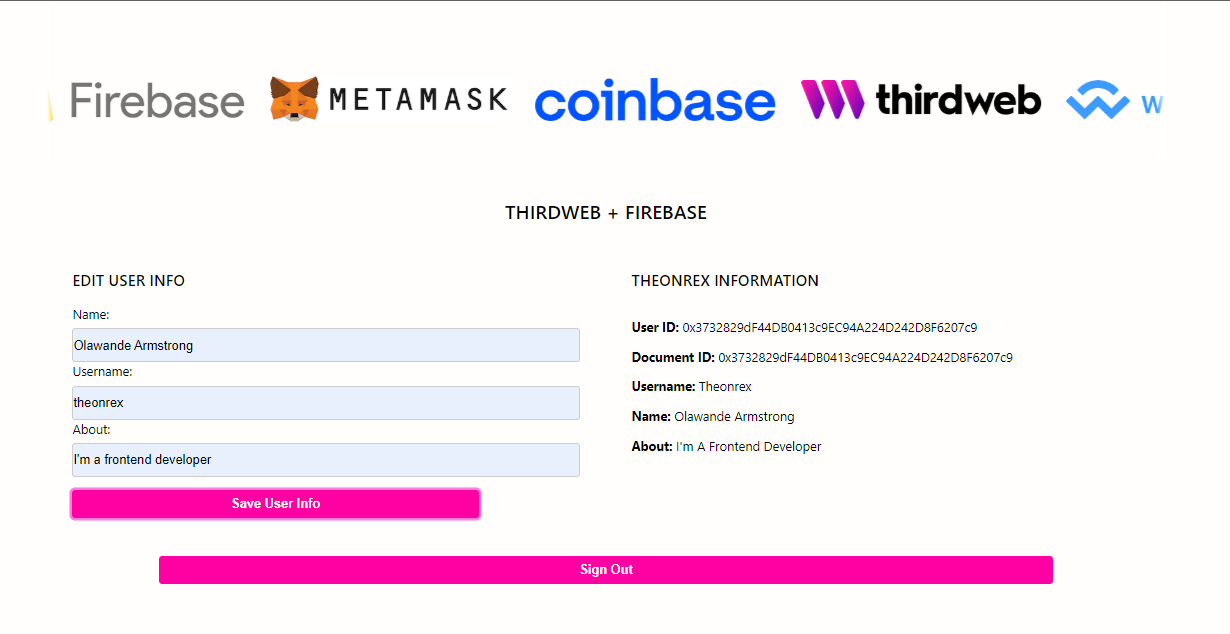
For more details and a live demonstration, you can visit the website here.
Pre-requisites
We recommend you have the following tools installed before you begin:
Node.js and npm: To install our SDK into your project
Git: For using the
createcommand in our CLI.
Make sure you have Node installed, as we will be using it to install all packages and dependencies in this tutorial. Download it here if you do not have it installed yet
Step 1
Create a Next.js app
To build this project, we will be using Next.js. Next.js is a flexible React framework that gives you building blocks to create fast web applications.
Open your code editor and create a folder named Auth-Tutorial.
To set up our Next.js project. Open up a terminal and execute these commands
npx create-next-app@latest auth-tutorial
Then hit Enter after each question. When prompted, pick Typescript over Javascript.
Run the development server
You now have a new directory called auth-tutorial. Let’s cd into it:
cd auth-tutorial
Then, run the following command:
npm run dev
This starts your Next.js app’s "development server" on port 3000.
Let’s check to see if it’s working. Open http://localhost:3000 in your browser.
Step 2
Install ThirdWeb and Firebase
Now let's install ThirdWeb. Thirdweb allows us to:
Build contracts and release or deploy them with ease.
Build apps, such as NFT marketplaces, through their pre-built software development kits (SDKs).
Manage Web3 apps.
Focus on the important stuff: utility and usability.
npm i @thirdweb-dev/sdk
npm i @thirdweb-dev/react
npm i @thirdweb-dev/auth
We would also be installing Firebase
npm i firebase
npm i firebase-admin
npm i ethers
Once we have that installed, we have to set up and configure Firebase for our project.
Step 3
Create a service account
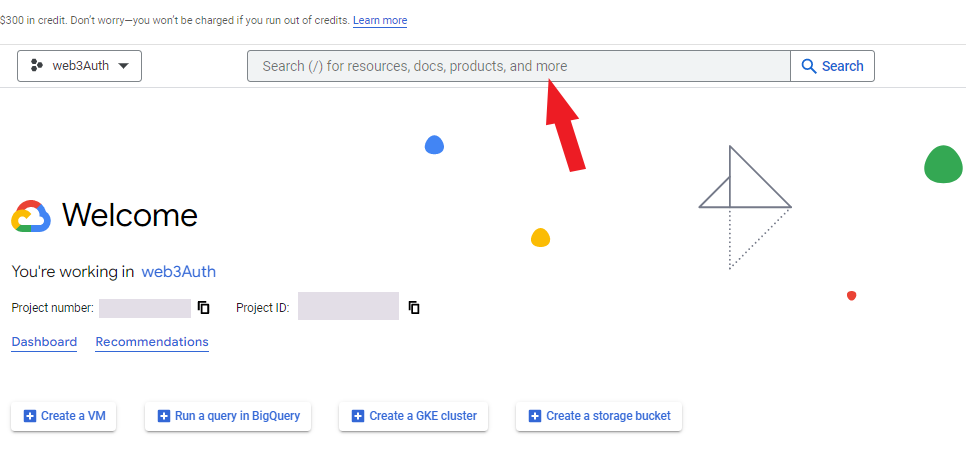
To set up Firebase for this project, we must create a service account on Google Cloud.A Google Cloud service account is a special kind of account that allows you to access Google Cloud resources programmatically. Service accounts are typically used by applications or compute workloads, such as a Compute Engine instance, rather than a person.
- Click "
Select A Project"

- Click "
New Project"

- Create a project. You can name it whatever you want, but for the sake of this tutorial, we will name our project "web3Auth". Click the "
Create" button when you're done.

- Google would create a new project for you automatically. Remember to keep your project details safe. To continue, click the
search barand select,IAM & Adminbut if it doesn't bring it for your input, IAM & Admin in the search bar will display it.

IAM and Admin would lead us to this page below. Once you're here, click "Service Accounts" on the left and click the "CREATE SERVICE ACCOUNT" on the navbar.
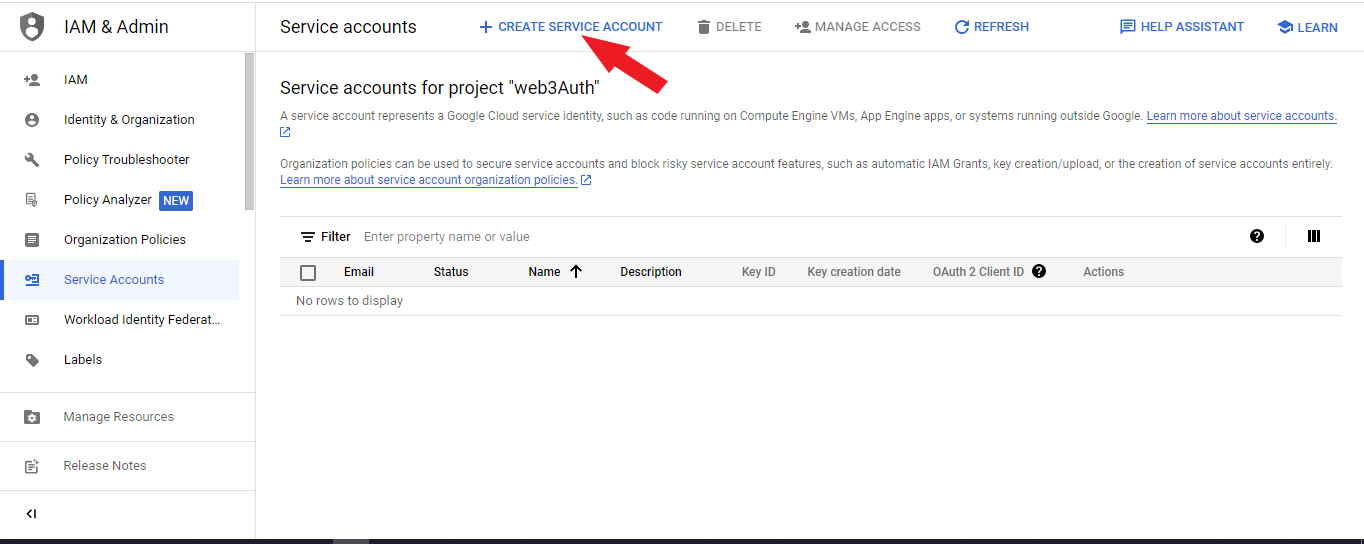
- To create a service account, input "
service account name" and Google will automatically generate a "service account ID" for you. Click the Create and Continue button. "Note: The following steps are optional, but we would take a walk through them.

Grant this service account access to the project (optional)
Grant this service account access to web3Auth so that it has permission to complete specific actions on the resources in your project
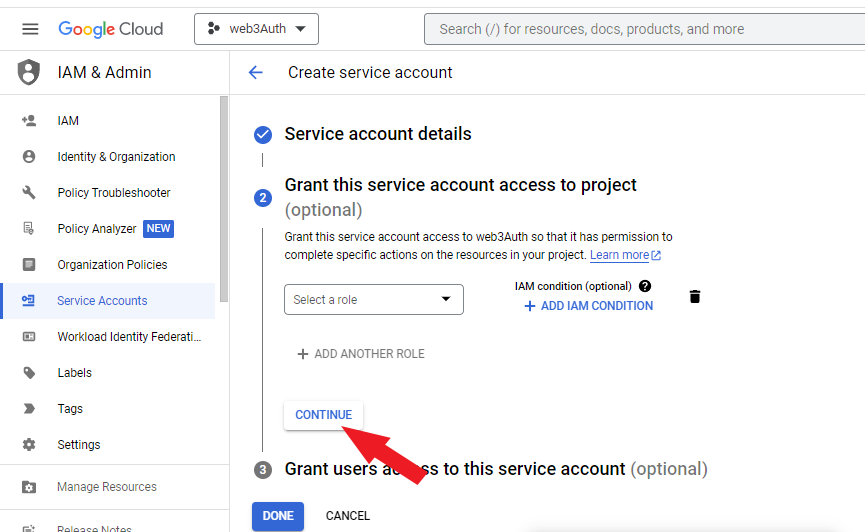
Grant users access to this service account (optional)
Grant access to users or groups that need to perform actions through this service account. Click done, and Google will create a service account for your project.

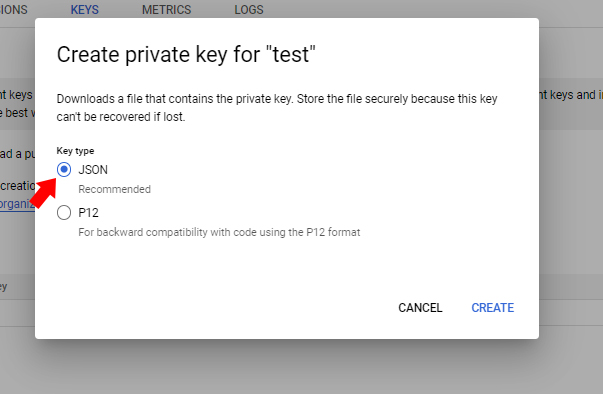
- Our service account has been created. We have one more step to go. We need to create and export our
service account keys. To do that, click the "Actions Icon" Select "Manage keys"

- Click "Add Key" and select "
create new key" from the dropdown.

Select,
JSONand it will download a JSON file automatically.Note: Keep the keys generated in your JSON file safe. Do not share it with the public.

If you open your JSON file, you will find something like this:

Create a file named.env in the root of your project directory and add the corresponding values to it:
FIREBASE_PRIVATE_KEY=<service-account-private-key>
FIREBASE_CLIENT_ID=<service-account-client-id>
FIREBASE_PRIVATE_KEY_ID=<service-account-private-key-id>
FIREBASE_CLIENT_EMAIL=<service-account-client-email>
Step 4
Create Firebase Project
Let's create a new project in Firebase to kickstart our project
If this is your first time working on Firebase, click "Create a project."
If you already have projects on Firebase, click "Add Project."
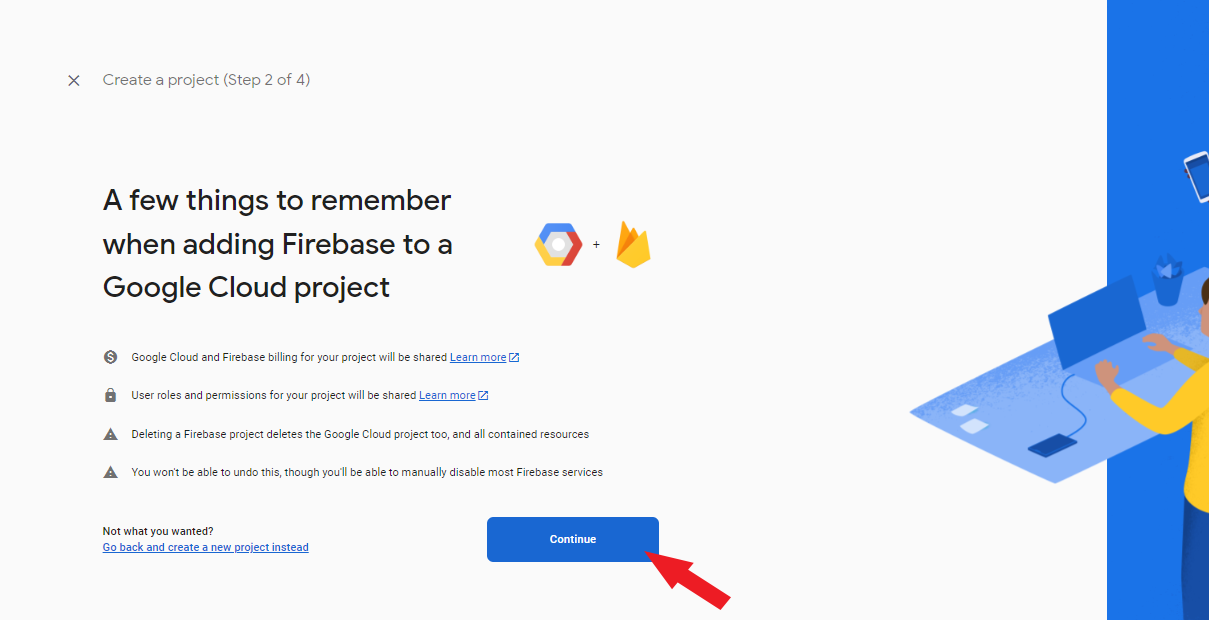
Remember we created a project on Google Cloud that we named "web3Auth". We would select the project we created google cloud and add it to Firebase. This action would link our Google Cloud and Firebase projects together, which would allow us to create user authentication. Click continue after you have selected it.

- Click "
continue"
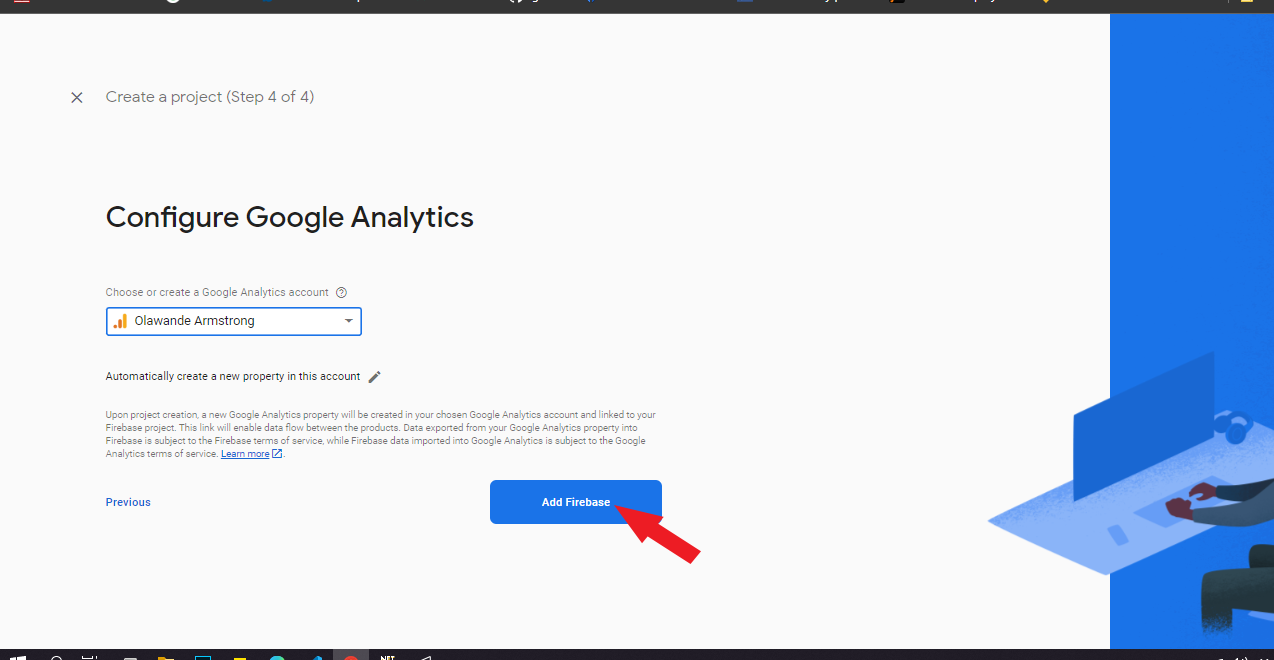
It is recommended that you Enable Google Analytics for this project

- Google would either recommend your account or let you create one. We would select the account Google recommends, which in my case is "Olawande Armstrong". Click "add Firebase,," and it will create a new Firebase account for your project.
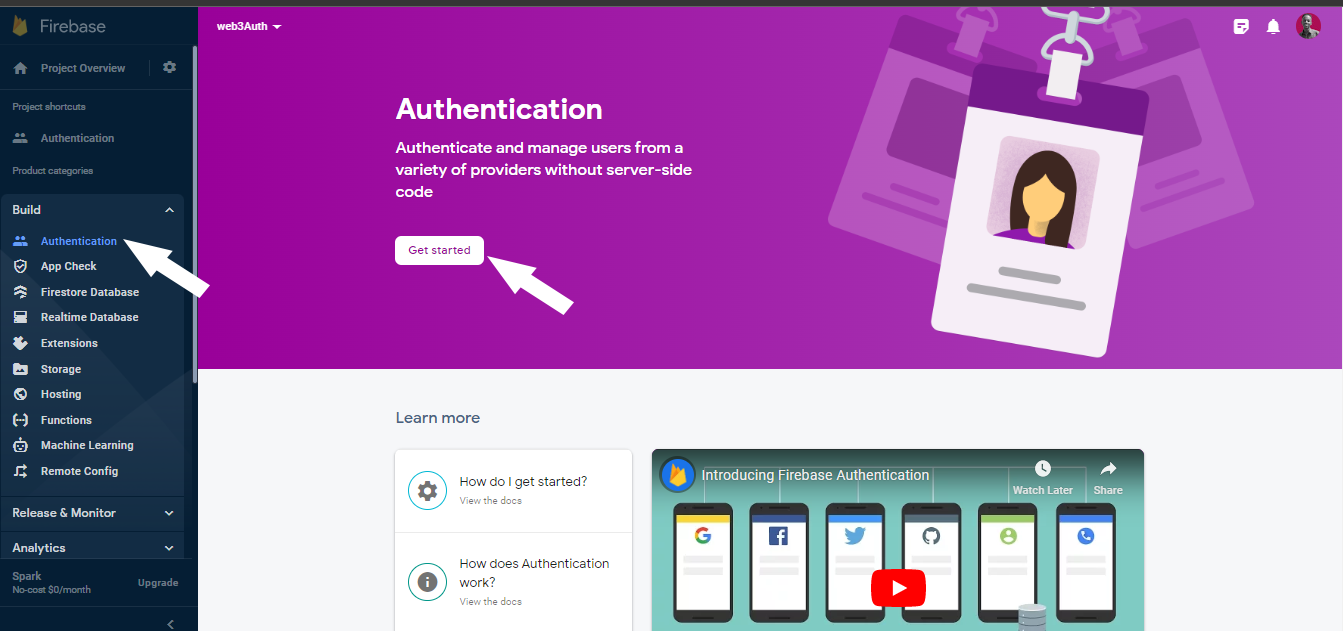
- Once your account has been created, Click "Authentication" and click Get Started.
The next step is to select and activate any sign-in method.
Note: We are not using this sign-in method but this is just done to activate the sign-in on Firebase, which we would be using on our app

- Click "save"

The next step is to add Firebase to our app.
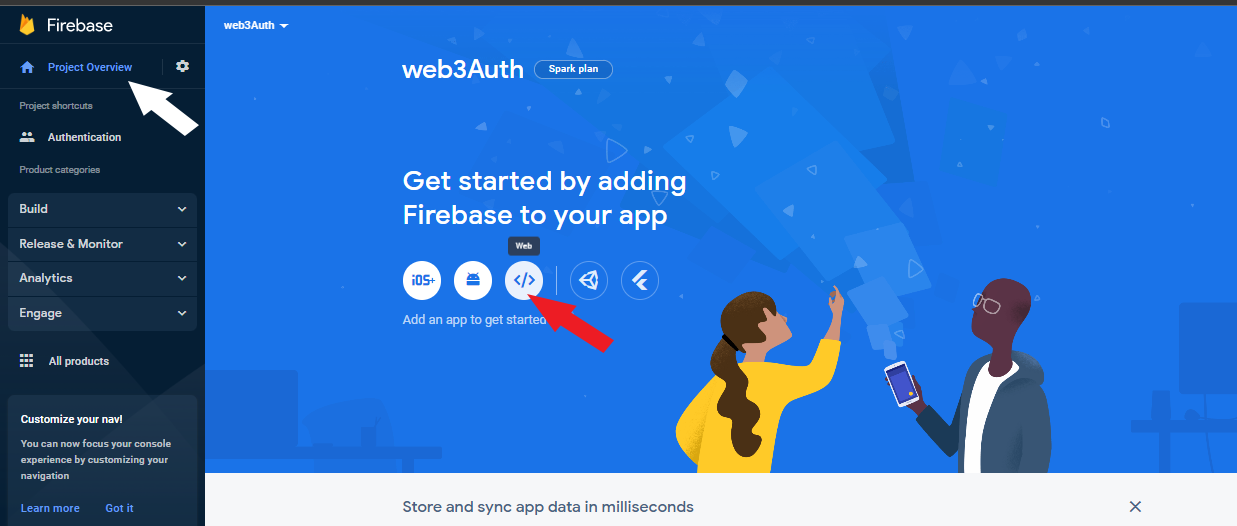
Click Project Overview on the top left action on the page
Click the "Web" icon since we are working on a website project.
- Input the name of the app you want to register. and click register app

- This would create all the keys you need to set up our app on next.js and allow users to sign in with their wallets.
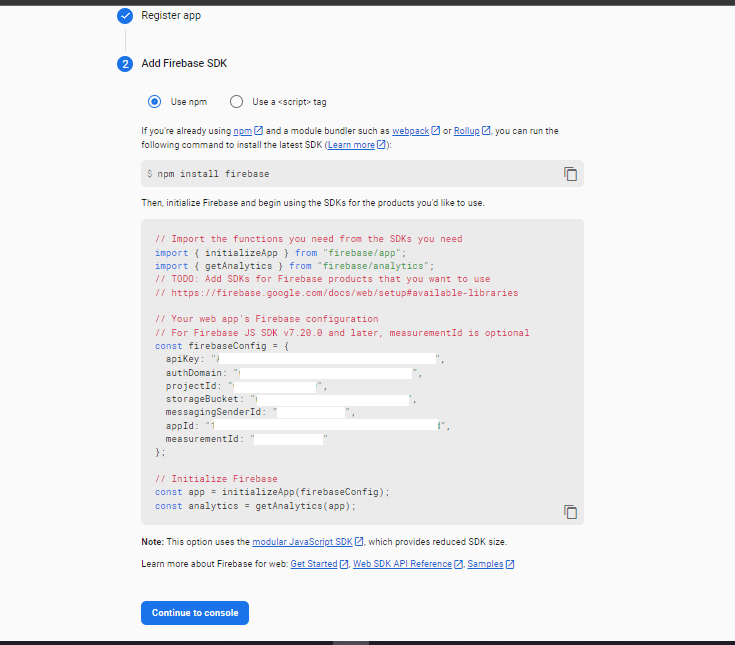
We'll use environment variables to store our Firebase configuration.
Add the corresponding values from your Firebase project to the.env file we created earlier in our next.js root project directory.
  NEXT_PUBLIC_API_KEY=<firebase-app-api-key>
  NEXT_PUBLIC_AUTH_DOMAIN=<firebase-app-auth-domain>
  NEXT_PUBLIC_PROJECT_ID=<firebase-app-project-id>
  NEXT_PUBLIC_STORAGE_BUCKET=<firebase-app-storage-bucket>
  NEXT_PUBLIC_MESSAGING_SENDER_ID=<firebase-app-messaging-sender-id>
  NEXT_PUBLIC_APP_ID=<firebase-app-app-id>
Building helper scripts
Configure Firebase
Create a new directory calledlib and create two helper scripts to initialize Firebase in the browser and server:
Create a file named initFirebase.ts
import { initializeApp } from "firebase/app";
import { Auth, getAuth } from "firebase/auth";
import { Firestore, getFirestore } from "firebase/firestore";

// Create Client-Side Instance of Firebase
export default function initializeFirebaseClient(): {
  db: Firestore;
  auth: Auth;
} {
  const firebaseApp = initializeApp({
    apiKey: process.env.NEXT_PUBLIC_API_KEY,
    authDomain: process.env.NEXT_PUBLIC_AUTH_DOMAIN,
    projectId: process.env.NEXT_PUBLIC_PROJECT_ID,
    storageBucket: process.env.NEXT_PUBLIC_STORAGE_BUCKET,
    messagingSenderId: process.env.NEXT_PUBLIC_MESSAGING_SENDER_ID,
    appId: process.env.NEXT_PUBLIC_APP_ID,
    measurementId: process.env.NEXT_PUBLIC_MEASUREMENT_ID,
  });

  const db = getFirestore(firebaseApp);
  const auth = getAuth(firebaseApp);

  return {
    db,
    auth,
  };
}
Create another file named initFirebaseAdmin.ts
import admin from "firebase-admin";
import { initializeApp, cert } from "firebase-admin/app";
import { Auth, getAuth } from "firebase-admin/auth";
import { Firestore, getFirestore } from "firebase-admin/firestore";

// Create Server-Side Instance of Firebase
export default function initializeFirebaseServer(): {
  db: Firestore;
  auth: Auth;
} {
  const clientEmail = process.env.NEXT_PUBLIC_FIREBASE_CLIENT_EMAIL;

const privateKey = process.env.NEXT_PUBLIC_MY_PRIVATE_VARIABLE;

  const projectId = process.env.NEXT_PUBLIC_INIT_PROJECT_ID;

  if (admin.apps.length === 0) {
    initializeApp({
      credential: cert({
        clientEmail,
        privateKey,
        projectId,
      }),
    });
  }

  const db = getFirestore();
  const auth = getAuth();

  return {
    db,
    auth,
  };
}
Now we can easily access Firebase Auth and Firestore in both client and server environments!
firebaseUsers.ts
import { onAuthStateChanged, User } from "firebase/auth";
import { useEffect, useState } from "react";
import initializeFirebaseClient from "./initFirebase";

// Helpful hook for you to get the currently authenticated user in Firebase.
export default function useFirebaseUser() {
  const [isLoading, setIsLoading] = useState(true);
  const [user, setUser] = useState<User | null>(null);
  const { auth } = initializeFirebaseClient();

  useEffect(() => {
    const listener = onAuthStateChanged(auth, (user) => {
      setUser(user);
      setIsLoading(false);
    });
    return () => {
      listener();
    };
  }, [auth]);

  return { isLoading, user };
}
useFirebaseDocument.ts
import { doc, DocumentData, onSnapshot } from "firebase/firestore";
import { useEffect, useState } from "react";
import initializeFirebaseClient from "./initFirebase";
import firebaseUsers from "./firebaseUsers";

// Helpful hook for you to read the currently authenticated user's document from Firestore using their ID
export default function useFirebaseDocument() {
  const { db } = initializeFirebaseClient();
  const { user, isLoading: loadingUser } = firebaseUsers();
  const [isLoading, setIsLoading] = useState(true);
  const [document, setDocument] = useState<DocumentData | null>(null);

  useEffect(() => {
    if (!loadingUser && user && db) {
      (async () => {
        const docRef = doc(db, "users", user.uid);
        const listener = onSnapshot(docRef, (doc) => {
          if (doc.exists()) {
            setDocument({
              ...doc.data(),
              id: doc.id,
            });
          } else {
            console.log("hey", doc);
            setDocument(null);
          }
          setIsLoading(false);
        });

        return () => {
          listener();
        };
      })();
    } else {
      setIsLoading(false);
    }
  }, [db, user, loadingUser]);

  return { isLoading, document };
}
- Create a folder named helpers in the root folder and create a file named types.ts
export interface UserData {
  userName: string;
  fullName: string;
  about: string;
}
import { getFirestore, doc, setDoc } from "firebase/firestore";
import { User } from "firebase/auth";

import { UserData } from "../helpers/types";

export const createUserDocument = async (user: User, userData: UserData) => {
  const { uid, email } = user;
  const userRef = doc(getFirestore(), "users", uid);

  const data = {
    email,
    username: userData.userName,
    fullName: userData.fullName,
    about: userData.about,
  };

  await setDoc(userRef, data);
};
Configure Thirdweb Auth
Finally, to configure Thirdweb Auth, we just need to add the NEXT_PUBLIC_THIRDWEB_AUTH_DOMAIN environment variable to the .env.local file as follows:
Your Thirdweb auth domain local env will be http://localhost:3000/ and in production, it will be your website link.
NEXT_PUBLIC_THIRDWEB_AUTH_DOMAIN=<thirdweb-auth-domain>
The NEXT_PUBLIC_THIRDWEB_AUTH_DOMAIN is used to prevent phishing attacks and is usually set to the domain of your project, like example.com. You can read more about it in the Thirdweb Auth Documentation.
ThirdwebProvider
Use this code in your _app.ts file
import type { AppProps } from "next/app";
import { ThirdwebProvider } from "@thirdweb-dev/react";
import "../styles/globals.css";

function MyApp({ Component, pageProps }: AppProps) {
  return (
    <ThirdwebProvider
      authConfig={{
        domain: process.env.NEXT_PUBLIC_THIRDWEB_AUTH_DOMAIN,
      }}
    >
      <Component {...pageProps} />
    </ThirdwebProvider>
  );
}

export default MyApp;
Sign Up or Log in.
The process of creating users in Firebase by authenticating them with their wallet has two steps:
Authenticate the user with their wallet
Create a user in Firebase with the knowledge that they own this wallet
On the homepage (pages/index.tsx), we'll allow the user to connect their wallet and then sign in with Ethereum.
import { useState } from "react";
import React from "react";
import { ConnectWallet, useAddress, useAuth } from "@thirdweb-dev/react";

import { signInWithCustomToken, signOut } from "firebase/auth";
import initializeFirebaseClient from "../lib/initFirebase";
import {
  getDoc,
  doc,
  serverTimestamp,
  setDoc,
  updateDoc,
} from "firebase/firestore";
import styles from "../styles/Home.module.css";
import firebaseUsers from "../lib/firebaseUsers";
import useFirebaseDocument from "../lib/useFirebaseDocument";

export default function Login() {
  const thirdwebAuth = useAuth();
  const address = useAddress();
  const { auth, db } = initializeFirebaseClient();
  const { user, isLoading: loadingAuth } = firebaseUsers();
  const { document, isLoading: loadingDocument } = useFirebaseDocument();
  const [username, setUsername] = useState("");
  const [fullName, setfullName] = useState("");
  const [about, setAbout] = useState("");

  const signIn = async () => {
    // Use the same address as the one specified in _app.tsx.
    const payload = await thirdwebAuth?.login();

    try {
      // Make a request to the API with the payload.
      const res = await fetch("/api/auth/login", {
        method: "POST",
        headers: {
          "Content-Type": "application/json",
        },
        body: JSON.stringify({ payload }),
      });

      // Get the returned JWT token to use it to sign in with
      const { token } = await res.json();

      // Sign in with the token.
      const userCredential = await signInWithCustomToken(auth, token);
      // On success, we have access to the user object.
      const user = userCredential.user;

      // If this is a new user, we create a new document in the database.
      const usersRef = doc(db, "users", user.uid!);
      const userDoc = await getDoc(usersRef);

      if (!userDoc.exists()) {
        // User now has permission to update their own document outlined in the Firestore rules.
        setDoc(usersRef, { createdAt: serverTimestamp() }, { merge: true });
      }
    } catch (error) {
      console.error(error);
    }
  };

  const saveUserInfo = async () => {
    if (!user) return; // check if user is null

    // Update the user document with the new user info
    const userRef = doc(db, "users", user.uid);

    if (username) {
      await updateDoc(userRef, "username", username);
    }

    if (fullName) {
      await updateDoc(userRef, "fullName", fullName);
    }

    if (about) {
      await updateDoc(userRef, "about", about);
    }
  };

  return (
    <div>
      <div className="container">
        <h1 className={styles.h1}>Thirdweb + Firebase</h1>

        {address ? (
          <div className={styles.rowx}>
            {!user ? (
              <button onClick={() => signIn()} className={styles.mainButton}>
                Sign in with Wallet
              </button>
            ) : (
              <div className="">
                <div className="col50">
                  <h2>Edit User Info</h2>
                  <label htmlFor="username">Name:</label>

                  <input
                    type="text"
                    name="fullName"
                    id="fullName"
                    value={fullName}
                    onChange={(e) => setfullName(e.target.value)}
                  />

                  <label htmlFor="username">Username:</label>
                  <input
                    type="text"
                    name="username"
                    id="username"
                    value={username}
                    onChange={(e) => setUsername(e.target.value)}
                  />

                  <label htmlFor="about">About:</label>
                  <input
                    type="text"
                    name="about"
                    id="about"
                    value={about}
                    onChange={(e) => setAbout(e.target.value)}
                  />

                  <button
                    onClick={() => saveUserInfo()}
                    className="save_user_details"
                  >
                    Save User Info
                  </button>
                </div>

                <div className="col50">
                  <h2>
                    {" "}
                    {document?.username ? document?.username : "Current"}{" "}
                    Information
                  </h2>
                  <p>
                    <b>User ID: </b>
                    {loadingAuth ? "Loading..." : user?.uid || "Not logged in"}
                  </p>
                  <p>
                    <b>Document ID: </b>
                    {loadingDocument
                      ? "Loading..."
                      : document?.id || "No document"}
                  </p>
                  <p>
                    <b>Username: </b>
                    {loadingDocument
                      ? "Loading..."
                      : document?.username || "Not logged in"}
                  </p>
                  <p>
                    <b>Name: </b>
                    {loadingDocument
                      ? "Loading..."
                      : document?.fullName || "Update your name"}
                  </p>{" "}
                  <p>
                    <b>About: </b>
                    {loadingDocument
                      ? "Loading..."
                      : document?.about || "Update About Me"}
                  </p>
                </div>

                <button onClick={() => signOut(auth)} className="sign_out">
                  Sign Out
                </button>
              </div>
            )}

            {}
          </div>
        ) : (
          <div>
            <p className={styles.explain}>
              To proceed, please authenticate using your wallet by clicking on
              the button below. This will result in the creation of a user
              account for you in Firebase Auth and a document in Firestore."
            </p>
            <ConnectWallet
              className="connect_wallet"
              btnTitle="Connect Wallet"
            />
          </div>
        )}
      </div>
    </div>
  );
}
api/auth/login.tsx
import { NextApiRequest, NextApiResponse } from "next";
import { verifyLogin } from "@thirdweb-dev/auth/evm";
import initializeFirebaseServer from "../../../lib/initFirebaseAdmin";

const login = async (req: NextApiRequest, res: NextApiResponse) => {
  try {
    // Grab the login payload the user sent us with their request.
    const payload = req.body.payload;

    const { address, error } = await verifyLogin(
      "https://web3-authentication-neon.vercel.app/",
      payload
    );
    if (!address) {
      return res.status(401).json({ error });
    }

    // Initialize the Firebase Admin SDK.
    const { auth } = initializeFirebaseServer();

    // Generate a JWT token for the user to be used on the client-side.
    const token = await auth.createCustomToken(address);

    // Send the token to the client-side.
    return res.status(200).json({ token });
  } catch (error) {
    return res.status(500).json({ error: error as string });
  }
};

export default login;
.env
NEXT_PUBLIC_THIRDWEB_AUTH_DOMAIN=<thirdweb-auth-domain>
NEXT_PUBLIC_API_KEY=<firebase-app-api-key>
NEXT_PUBLIC_AUTH_DOMAIN=<firebase-app-auth-domain>
NEXT_PUBLIC_PROJECT_ID=<firebase-app-project-id>
NEXT_PUBLIC_STORAGE_BUCKET=<firebase-app-storage-bucket>
NEXT_PUBLIC_MESSAGING_SENDER_ID=<firebase-app-messaging-sender-id>
NEXT_PUBLIC_APP_ID=<firebase-app-app-id>
FIREBASE_PRIVATE_KEY=<service-account-private-key>
FIREBASE_CLIENT_ID=<service-account-client-id>
FIREBASE_PRIVATE_KEY_ID=<service-account-private-key-id>
FIREBASE_CLIENT_EMAIL=<service-account-client-email>
Viewing the Result
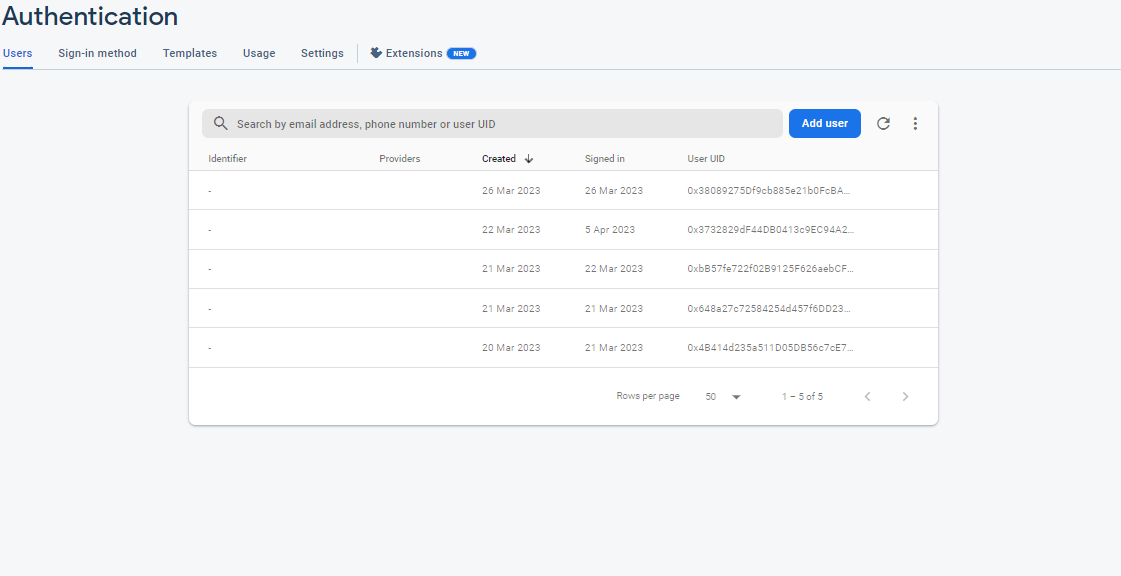
When you click the "Sign in with Ethereum" button and successfully sign in, you'll be signed up as a user in Firebase.
A new document will be created in your users collection in Firestore:

The final result of the website
You can now use all the functionality of Firebase Authentication and Firestore to build your app!
Conclusion
In conclusion, Web3 authentication offers a more secure and private approach to online authentication compared to traditional Web-2 methods. It leverages decentralized, blockchain-based technologies to verify user identities without revealing personal information. By using digital wallets, Web3 authentication ensures the integrity of transactions on the blockchain.
The tutorial demonstrates the implementation of Web3 authentication using the Thirdweb SDK and MetaMask, enabling a Firebase Web3 sign-in. This practical example helps developers understand and apply Web3 authentication concepts to their projects.
Overall, Web3 authentication has the potential to revolutionize online security by empowering individuals with greater control over their digital identities. It holds the promise of a future where users can engage in secure online transactions while maintaining their privacy.
References
GitHub Repository: GitHub Url
Official SDK Documentation: Thirdweb Docs
Project Website: Project Url
FireBase Docs: FireBase Docs